
Merchant guide
How to use Groopie
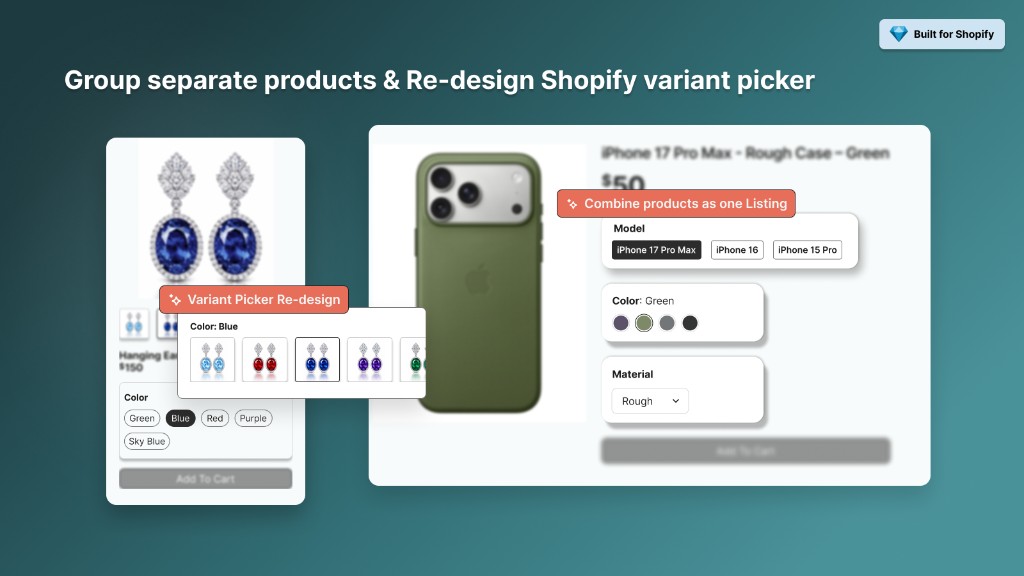
Group separate products into one storefront picker, or redesign Shopify’s default variant selector with image, button, or dropdown swatches — without Shopify Plus.
What Groopie does
Groopie links related products — for example the same jacket in Olive, Navy, and Black — into one storefront listing with swatches. Shoppers switch options without leaving the page. Each product keeps its own URL, title, images, and inventory.
You can also redesign Shopify’s default variant picker with image, button, color, or dropdown swatches, show options on collection and search results, and add Frequently Bought Together groups on the product page. Everything is configured in the app and the theme editor — no code required.
Install & open the app
- Open GROOPIE on the Shopify App Store and click Install.
- Approve the requested permissions for your store.
- After install, open the app from Shopify Admin → Apps → GROOPIE (listed as GROOPIE: Product variants).
Create your first product group
A product group is the set of separate products you want shoppers to treat as one listing (for example three color products of the same style).
- In the Groopie app, create a new product group.
- Pick the products that belong together — same style in different colors, materials, or models.
- Set the shared option shoppers will switch (usually Color, Size, or Material).
-
Choose how each option looks:
- Color — solid color chips for plain colors
- Image — product or pattern thumbnails
- Button — text labels (sizes, styles)
- Dropdown — compact list when you have many options
- Save the group. You can edit members and swatch style anytime.
Free plan includes up to 10 product groups. Grow ($4.99/mo) raises the limit to 1,000 groups.
Theme setup
Groopie is designed for Online Store 2.0 themes. You add and style swatches in the theme editor — no theme code edits required for standard setups.
Product page (start here)
- Go to Online Store → Themes → Customize.
- Open a product template that should show the grouped picker.
- Add the Groopie app block (or section) near the buy buttons / variant area. If your theme already has a default variant picker, hide or replace it so shoppers only see one set of options.
- In the block settings, pick swatch style, size, and options such as hide out-of-stock.
- Save the theme and preview a product that belongs to a group.
To restyle a product’s native Shopify options (without grouping separate products), use Variant Redesign instead of replacing the theme picker with an app block.
Collection, search, and home
After the product page works, enable swatches on collection cards, search results, and home featured products using the matching Groopie blocks or settings for those templates. Free and Grow both include variants on collection and search; confirm the placement is enabled for each template you use.
Redesign Shopify’s default variant picker
Variant Redesign restyles a product’s native Shopify options — Color, Size, Denominations, and so on — without grouping separate products. You choose a display type per option: keep the theme default, switch to a dropdown or custom buttons, or show variant images.
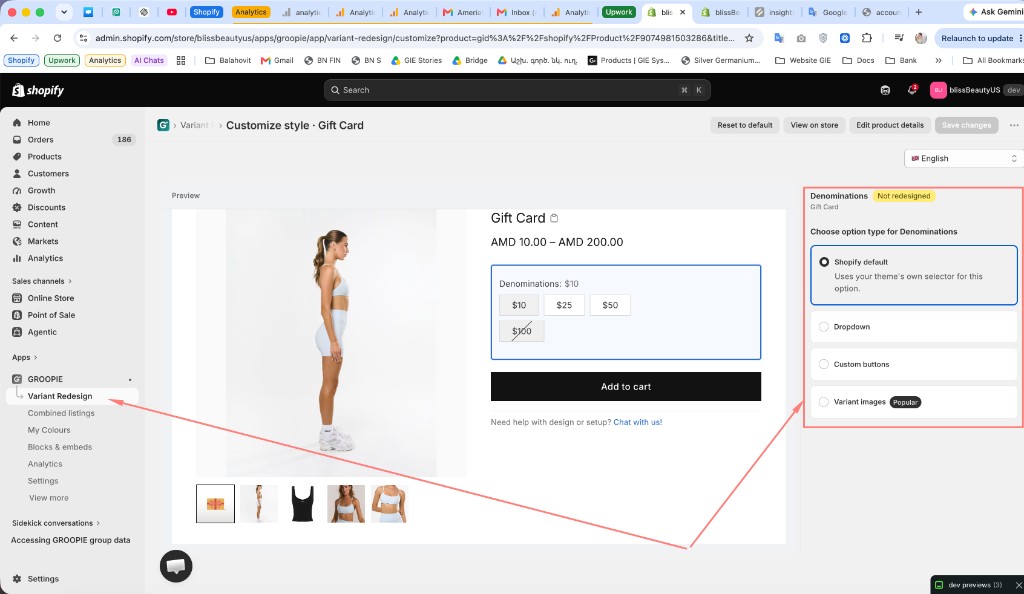
1. Open Variant Redesign and select a product
In Shopify Admin, go to Apps → GROOPIE → Variant Redesign. Choose the product whose picker you want to restyle. The editor opens with a live product-page preview on the left and option settings on the right.
2. Choose an option type
Click the option you want to change (for example Denominations or Size). Under Choose option type, pick how that option should appear on the storefront:
- Shopify default — keep your theme’s own selector for this option
- Dropdown — compact list
- Custom buttons — text buttons for each value
- Variant images — thumbnail swatches for each value (the usual choice for colors and styles)
You can restyle one option and leave others on Shopify default. The screenshot below shows setting up variant images for an option.
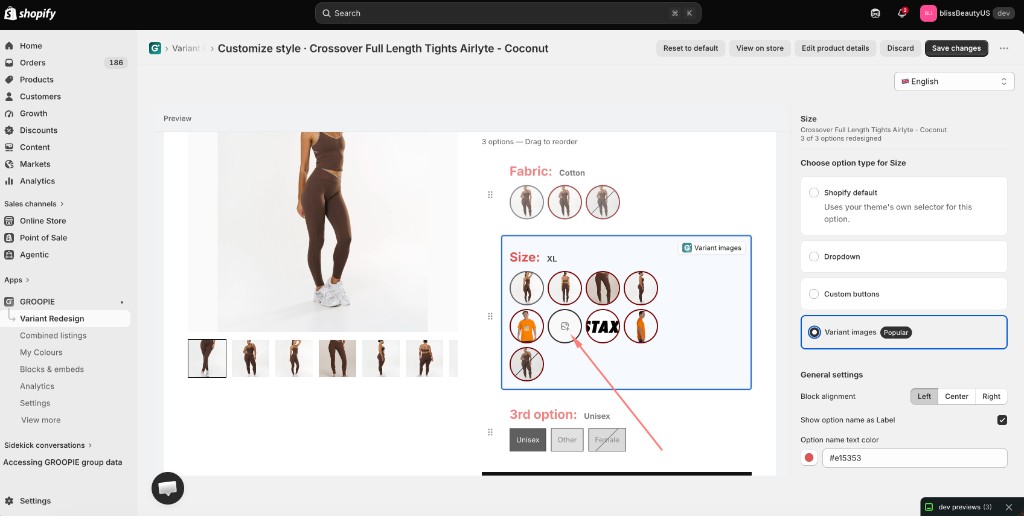
3. Click the upload icon on a value
After you switch to Variant images, the preview shows a swatch for each value. Values without a picture show an upload icon (a square with a plus). Click that icon to assign an image.
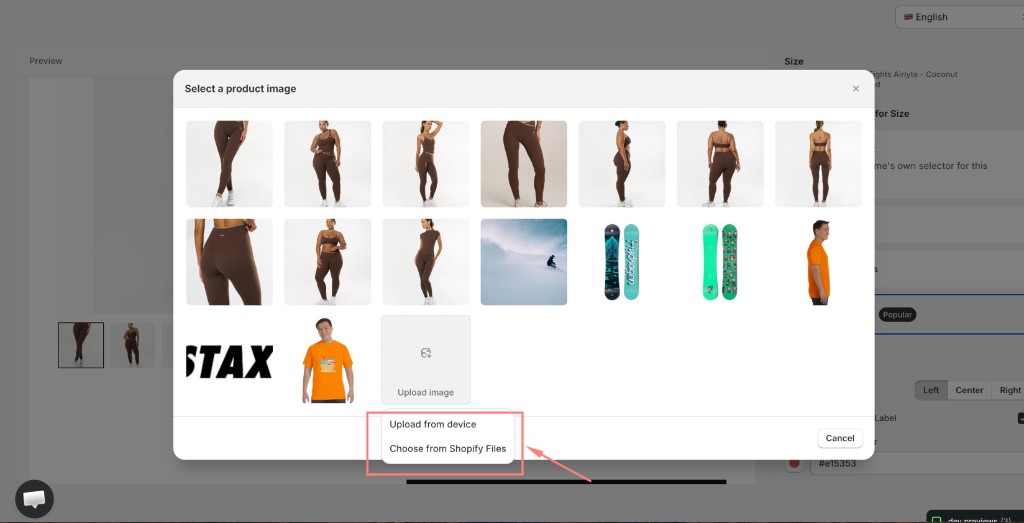
4. Choose an image
The Select a product image popup opens. You can:
- Click an image in the group gallery — photos already used on this product or group
- Click Upload image, then Upload from device
- Click Upload image, then Choose from Shopify Files
Repeat for each value that needs a picture. You can still adjust alignment, the option-name label, and label color in the right-hand panel before you save.
5. Save changes
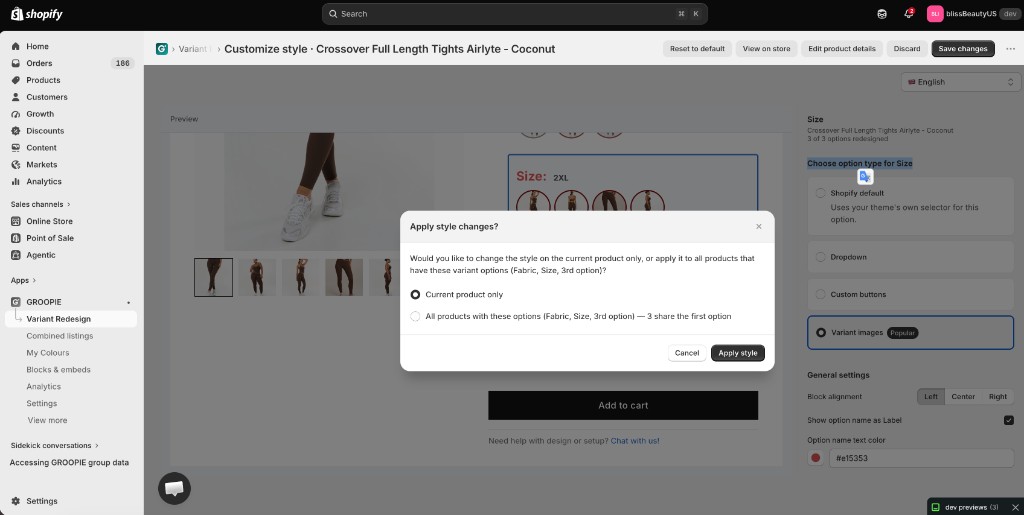
Click Save changes. Groopie asks how to apply the new style:
- Current product only — update this product’s picker and leave other products unchanged
- All products with these options — find every product that uses the same option names (for example Fabric, Size) and apply the new style to them as well
Choose an option, then click Apply style. Use current product only if you are testing; use all products when the same options should look the same across the catalog.
Where swatches appear
| Location | What shoppers see | Plan notes |
|---|---|---|
| Product page | Grouped picker; switch color/style without leaving the page | Free & Grow |
| Collection | Swatches on product cards so options are visible while browsing | Free & Grow |
| Search | Swatches on search result cards | Free & Grow |
| Home | Swatches on featured / home product sections when enabled | Free & Grow |
| Frequently Bought Together | Paired product groups on the product page | Included on Free & Grow |
Free vs Grow: group capacity (10 vs 1,000), advanced customization and priority support on Grow, plus the in-app Groopie Analytics dashboard on Grow. The public swatch click event for GA, Klaviyo, and custom tools works on both plans.
Common setups
Same product, different colors
Create one product per color (each with its own images and inventory). Put them in one Groopie group with option name Color. Use color or image swatches. This is the most common combined-listing setup on Basic, Grow, and Advanced plans.
Size + color (multi-level)
Groopie supports single and multi-level swatches. Keep size as a normal variant on each product (S / M / L), and use the product group for color across products — or structure both levels in the app if your catalog is split that way. Preview on mobile so both option rows stay clear.
Auto-group from titles or tags
If your products already share a naming pattern or tags (for example
color-navy), use Groopie’s auto-create
groups from titles or tags to build groups faster, then review and adjust swatch styles
before publishing.
Frequently Bought Together
Separately from combined listings, create Perfectly Paired (FBT) groups to suggest complementary products on the product page and lift average order value.
Troubleshooting
- Swatches not showing on the product page
- Confirm the product is in a saved group, the Groopie app block is on the product template you are viewing, and you saved the theme. Hide the theme’s default variant picker if both are visible or conflicting. Hard-refresh the storefront (or preview in an incognito window) to rule out cache.
- Theme not supported / block missing
- Groopie expects an Online Store 2.0 theme with app-block support. Older vintage themes may not list app blocks. Switch to a supported 2.0 theme, or contact support if you are stuck mid-migration.
- Wrong products grouped
- Edit the group in the app and remove stray products. If you used auto-group from titles or tags, fix the naming/tags first, then rebuild or clean the group so only true siblings remain.
- Collection or search swatches missing
- Enable Groopie on the collection / search / home templates in the theme editor, not only on the product template. Check that the card section allows app blocks.
- Out-of-stock options still visible
- Turn on hide out-of-stock in the app block settings and ensure inventory is tracked on the child products.
- Variant images not showing after redesign
- Confirm the option type is set to Variant images, every value has a picture (no leftover upload icons), and you clicked Save changes. Preview the live product page (or use View on store) after a hard refresh.
Swatch click event (Google Analytics, Klaviyo & custom tools)
GROOPIE fires a custom JavaScript event whenever a shopper clicks a swatch on your storefront. You can listen for it and send the data to Google Analytics, Google Tag Manager, Klaviyo, or any other tracking tool.
- This works on Free and Grow.
- The in-app Analytics dashboard (destinations, colors, locations) is available on Grow only.
Event name
groopie:swatch_clicked
Where it fires
- Product page swatches (single-line and multi-option groups)
- Collection, search, and home embeds (product cards), when GROOPIE swatches are enabled
The event is dispatched asynchronously so it does not block navigation.
How to listen
Add this to your theme (or run it via Google Tag Manager):
window.addEventListener('groopie:swatch_clicked', function (e) {
  console.log('Swatch clicked:', e.detail);
});
Event detail properties
| Property | Type | Description |
|---|---|---|
| optionValue | string | null | Swatch label (e.g. Blue, Large) |
| productHandle | string | null | Destination product handle |
| productId | number | null | Shopify product ID when available on the swatch |
| productUrl | string | null | URL of the destination product |
| productTitle | string | null | Product title when available |
| productPrice | string | null | Formatted price when available on the swatch; otherwise null |
| productAvailable | boolean | null | Stock availability when known |
| isCurrent | boolean | null | true if this was already the selected swatch |
| colorHex | string | null | Color hex for color swatches |
| swatchType | string | Control type (colorDots, image, button, dropdown, etc.) |
| context | string | product_page or product_card |
| viewport | string | desktop or mobile |
| position | number | Zero-based index in the option group when known; otherwise -1 |
| groupOptionName | string | null | Option name when known (e.g. Color) |
| fromProductHandle | string | null | Handle of the product the shopper was viewing |
| timestamp | number | Unix timestamp in milliseconds |
Example: Google Analytics (gtag)
window.addEventListener('groopie:swatch_clicked', function (e) {
  if (window.gtag) {
    gtag('event', 'swatch_click', {
      product_id: e.detail.productId,
      product_name: e.detail.productTitle,
      product_handle: e.detail.productHandle,
      option_value: e.detail.optionValue,
      swatch_type: e.detail.swatchType,
      context: e.detail.context
    });
  }
});
Example: Klaviyo
window.addEventListener('groopie:swatch_clicked', function (e) {
  if (window.klaviyo) {
    klaviyo.track('Swatch Clicked', {
      ProductID: e.detail.productId,
      ProductName: e.detail.productTitle,
      ProductHandle: e.detail.productHandle,
      ProductURL: e.detail.productUrl,
      OptionValue: e.detail.optionValue,
      SwatchType: e.detail.swatchType,
      Context: e.detail.context
    });
  }
});
After this is live, “Swatch Clicked” (or your chosen event name) can appear in Klaviyo metrics and be used in flows or segments. GROOPIE does not sync to Klaviyo automatically — this snippet is the bridge.
Example: custom endpoint
window.addEventListener('groopie:swatch_clicked', function (e) {
  fetch('/apps/your-tracker', {
    method: 'POST',
    headers: { 'Content-Type': 'application/json' },
    body: JSON.stringify({
      event: 'swatch_click',
      data: e.detail
    }),
    keepalive: true
  });
});
Debugging
- Open a storefront product or collection page that shows GROOPIE swatches.
- Open the browser console.
-
Paste:
window.addEventListener('groopie:swatch_clicked', function (e) { console.log('groopie:swatch_clicked', e.detail); }); - Click a swatch — you should see the event payload.
If nothing logs: confirm GROOPIE swatches are visible on that page, hard-refresh, and make sure your listener script loads on that template.
Groopie Analytics (Grow)
Want click insights without custom code? Grow includes the Groopie Analytics dashboard (top destinations, colors, and locations). The public event still fires on Grow if you also use GA, Klaviyo, or GTM.
FAQ
- Do I need Grow for the JavaScript event?
- No. The event is available on Free and Grow.
- Will this slow down my storefront?
- No. The event is dispatched asynchronously after the click and does not add network requests by itself. Only your own GA/Klaviyo/custom listener may send data.
- Does this replace Shopify’s Combined Listings analytics?
- No. This is GROOPIE’s own storefront event for your tools and (on Grow) the Groopie Analytics dashboard.
FAQ
- Do I need Shopify Plus?
- No. Shopify’s native Combined Listings app is Plus-only. Groopie works on Basic, Grow, and Advanced.
- Can I redesign the picker without grouping products?
- Yes. Variant Redesign restyles a product’s native Shopify options. Product groups are only needed when you want separate products to appear as one listing.
- Will this hurt my SEO?
- Each product keeps its own URL and page. Grouping changes how options appear on the storefront; it does not merge products into a single handle.
- How does inventory work?
- Inventory stays on each product (and its variants). When a shopper picks a swatch, they add that product’s inventory to cart — not a synthetic parent SKU.
- What are the plan limits?
- Free: up to 10 product groups, variant picker redesign, collection/search swatches, FBT groups, and the swatch click event for GA, Klaviyo, and custom tools. Grow ($4.99/mo, 7-day trial): up to 1,000 groups, advanced customization, priority support, and the in-app Groopie Analytics dashboard (destinations, colors, locations). See the app page for the full comparison.
- Can I try before I buy?
- Yes — start on Free, or use the Grow 7-day free trial. You can also browse the demo store.
Ready to set it up?
Install Groopie, create one product group, and enable the app block on your product template. Most stores see swatches live in a few minutes.